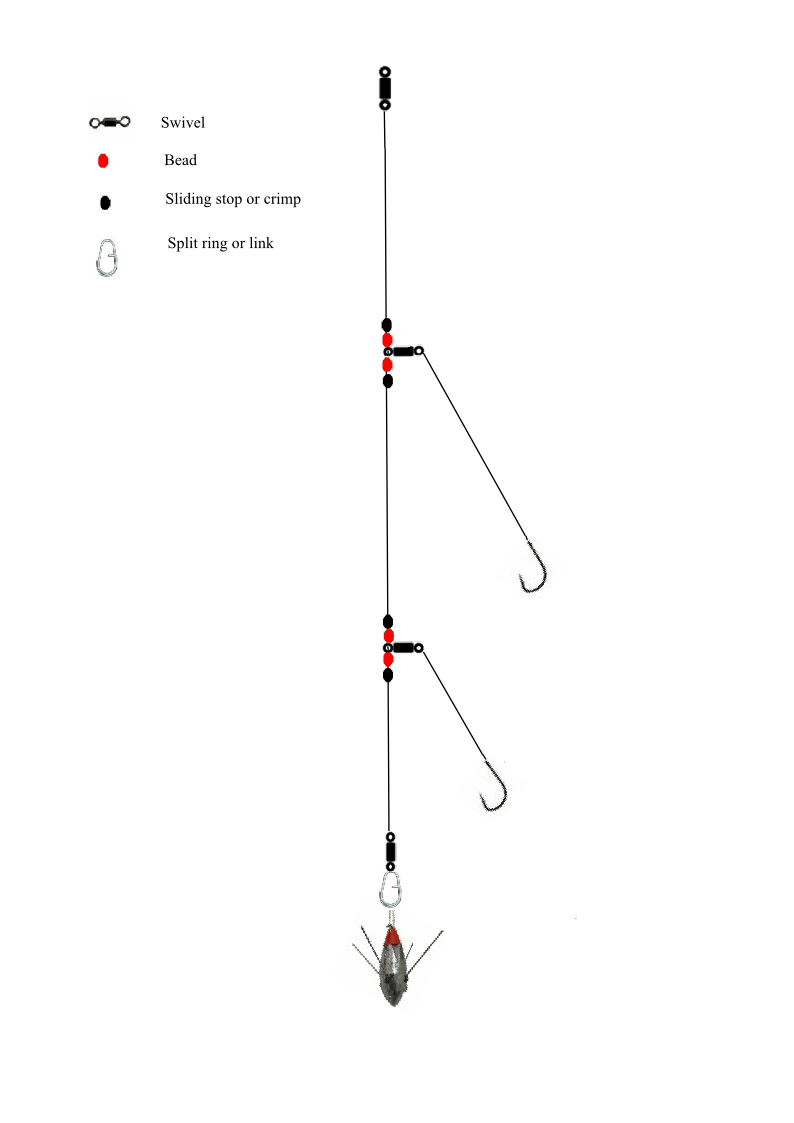
Flapper
The flapper paternoster is probably the most popular rig for all general types of bottom fishing and it will take most bottom feeders. It’s known as a flapper as that’s what the baits do when being cast out, because of this, it’s not really suitable for long distance casting. If distance is the aim, then a clipped paternoster rig is the better option.
The one illustrated is a two hook adjustable but you can make up a three hook or how ever many you want. It’s adjustable in that the trapped swivels that connect to the hook lengths are held in place by sliding stops; this means that they can have their positions altered on the rig body by sliding either up or down. It can be made as a fixed position rig by using crimps instead of sliding stops. I have made the hook lengths at 12 inches but they can be longer or shorter – just make sure that the hook length does not hit the hook length above it or below it, so adjust the distance between the trapped swivels accordingly.
The guide is for an adjustable flapper. If you want to make it fixed, just replace the stops with crimps.
1. Take a 4 foot (or however long you want) length of of 60 -80lbs shock leader for the rig body and tie a swivel to one end which will be the top.
2. For the adjustable stops, you can use either 4m lengths of 1mm silicon tubing or use stop knots. I prefer to use the silicon tubing and will describe here how to do them.
3. Slide a 4mm section on to the end of the line and then form a loop with the free end and pass the line back through the tubing without knotting it and pull. You should now have what looks like a silicon knot. Do this another two times.
4. Slide the ‘stops’ up the line until they are twelve inches from the swivel.
5. Slide on a bead, then a swivel followed by another bead.
6. Repeat step three and make another 4-5 stops. You may need more depending on the type of line and diameter, make enough until there is enough resistance to prevent the swivel being moved easily.
7. Repeat step three and make three stops and move them up the line until they are 12 inches from the second set of stops.
8. Repeat step 5 and then step 7.
9. Tie a lead clip or split ring to the free end of the rig body.
10. Tie your hook lengths (no more than twelve inches) to the two trapped swivels
11. Tie hooks to hook lengths.
You could replace the lower of the trapped swivels with a cascade swivel to allow changing this into a clipped down rig along with using an impact weight that has the built in bait clip (as shown) or bait shield.


